When the growing season comes to a close and harvest time draws near, it is important to use the best possible tools to preserve your home-raised foods. Pressure canning lengthens the life of a variety of foods, from garden vegetables to hunted meats and fish. Perhaps you are still deciding on which pressure cooker will best suit your needs, or maybe you are hoping to get better acquainted with your new All American 1930 No. 921 Pressure Canner. In this guide, we’ll be going over a variety of topics that are essential to preparing the best possible home-preserved foods with All American 1930 Pressure Canners, including the reasons behind pressure canning, what foods require pressure canning, and ways to overcome common hurdles during the canning process.
Why Pressure Can Food?
If you’re interested in preserving home-grown vegetables or would like to make one-can meals like beef stew or chicken soup, then pressure canning is for you. Pressure canning allows low-acid foods like green beans, potatoes, carrots, and meats to be shelf stable. Foods that are low in acid require higher canning temperatures to kill off any bacteria, which can thrive in low-acid environments. Pressure canners can also be used as water bath canners to process high-acid foods, making them one of the most versatile food-preservation tools in your kitchen.
What is Pressure Canning?
In pressure canning, water must be brought above its boiling point to 240°F in a pressure canner, which is specially designed to reach high internal temperatures. Low-acid foods with a 4.6 pH or higher must then be jarred, partially submerged in the water, and locked into the pressure canner for a period of time (determined by tested recipes). Molds, yeast, and harmful bacteria such as botulism are destroyed in low-acid foods at this temperature, allowing them to safely be consumed without refrigeration. Properly canned foods can remain shelf stable for up to one year.
Foods to Pressure Can
Low-acid foods 4.6 pH or higher, including:
- Vegetables: Okra, carrots, beets (non-pickled), turnips, green beans, peppers, lima beans, peas, corn, and potatoes
- Meats & Fish: Beef, pork, chicken, wild game, and seafood
- Mixed High & Low Acid Foods: Chili, soups, and mixed vegetables
Must-Have Tools for Pressure Canning
Aside from a pressure cooker, a few key items can aid your pressure canning process. While we offer a wide range of products that are specially designed for canning and describe them further in our Top 10 Home Canning Supplies & Tools list, these four items are critical to properly preserving foods during your canning process:
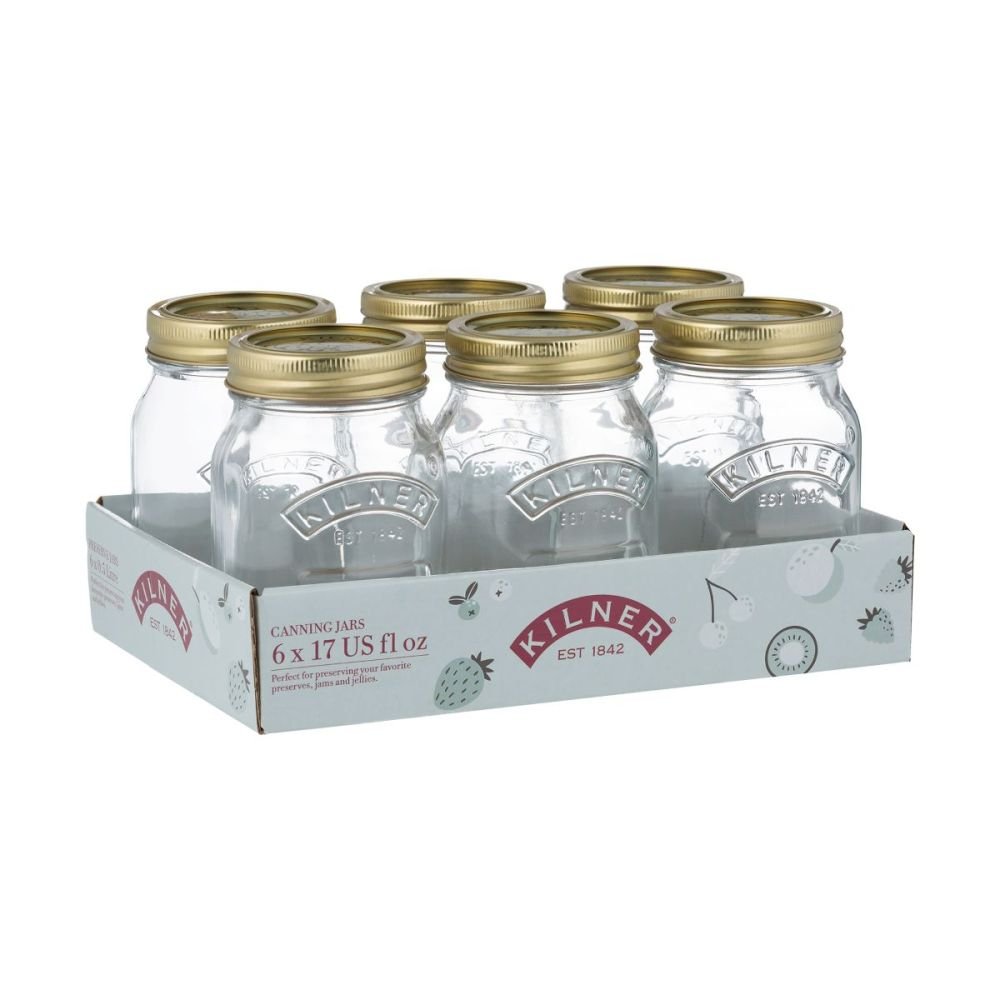
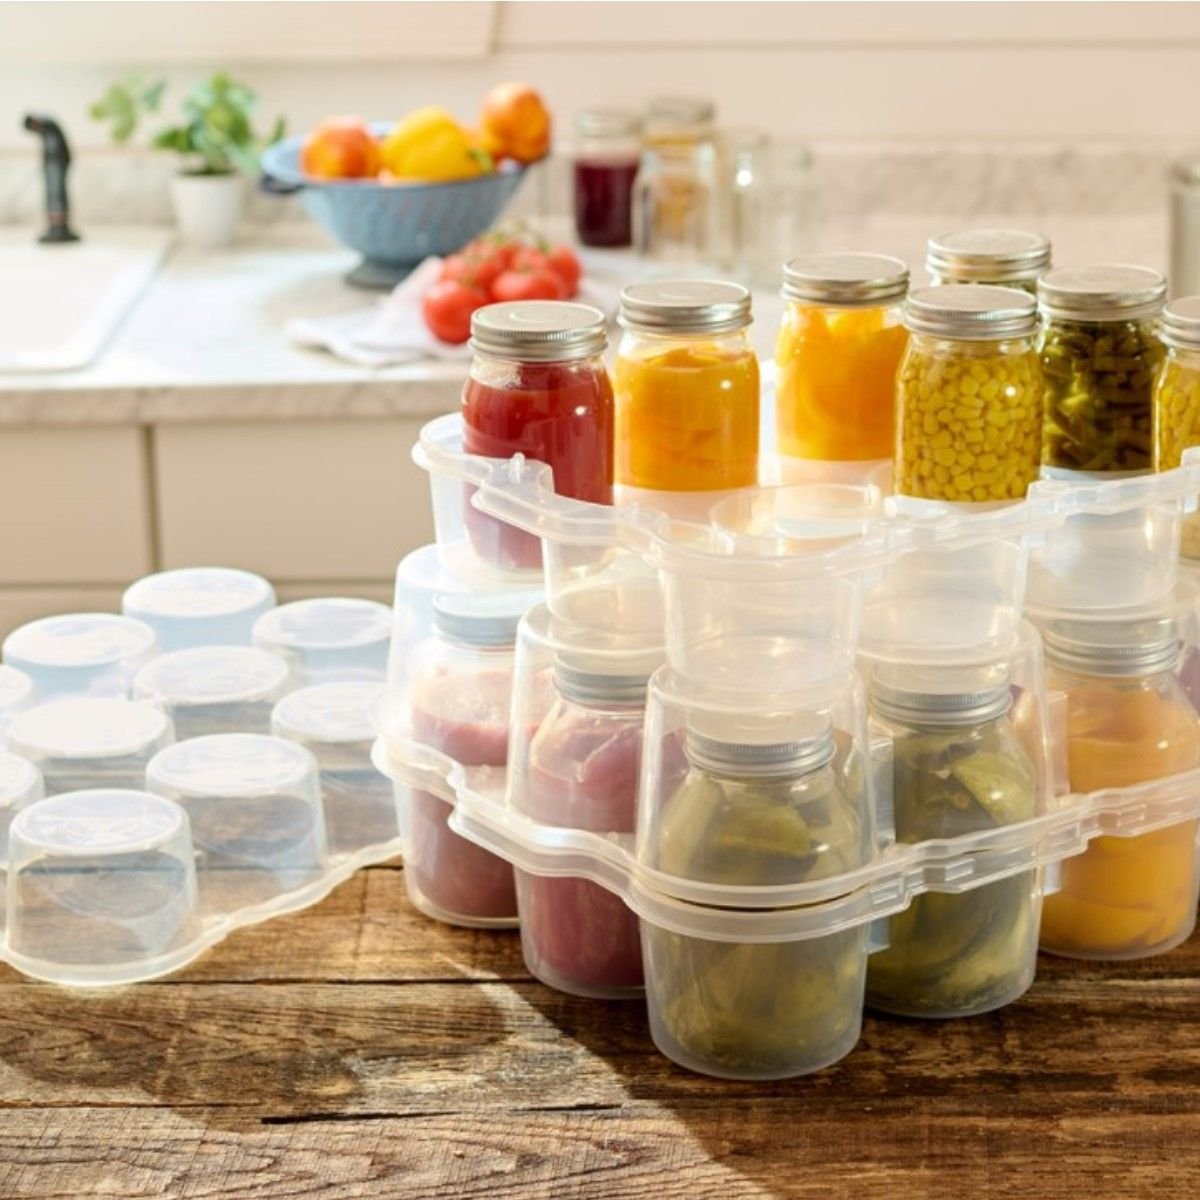
- Jars - It may be a given, but choosing the proper jars for your canning process is crucial to keeping your pantry stocked with home-raised and homemade foods. We offer a wide range of Kilner jars that are suited to a variety of recipes, from smaller jam and jelly jars to standard quart and pint jars. Properly cared for jars can last several canning seasons, however, lids must be replaced when canning new foods. Used lids may not create the vacuum-tight seal required to keep food from spoiling, so it is important to never reuse them.
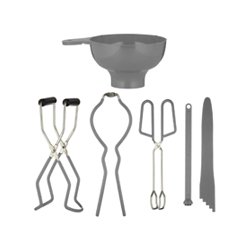
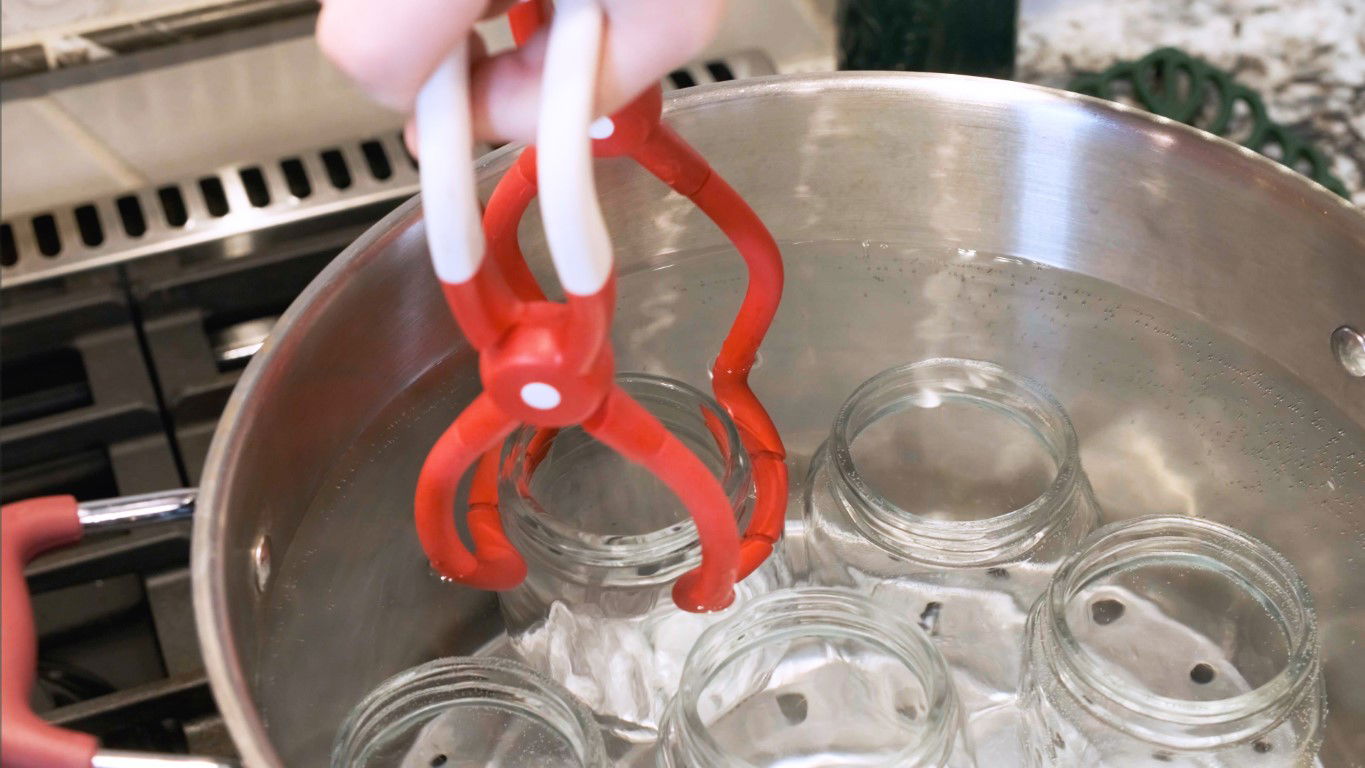
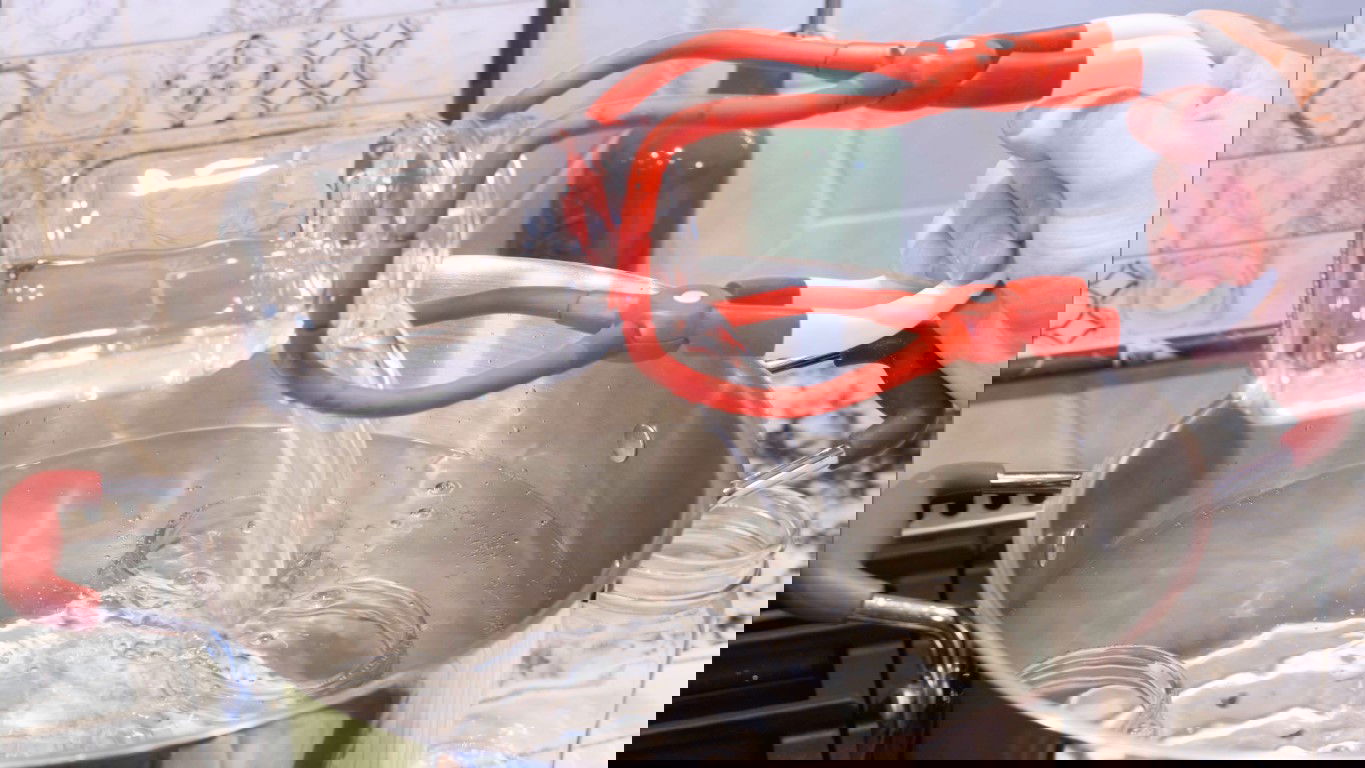
- Jar & Lid Lifters - Handling hot lids and extracting jars from boiling water can be dangerous, but using lid lifters and jar lifters can prevent burns and allow for a safer experience. Jar lids must be sterilized before being sealed to jars, so a magnetic lid lifter makes it safe to boil and remove them from the pressure canner. After your canned food has been processed, a jar lifter will let you easily remove the hot jars from the water, minimizing the chance of accidents.
- Canning Funnel - Filling jars with narrow openings can be messy, but using a canning funnel can make it much easier. A canning funnel fits in the opening of your jar and allows foods to flow inside rather than splashing or running down the sides of the jar. There are canning funnel sizes for standard neck jars of 2.25" and for wide mouth jars of 2.75".
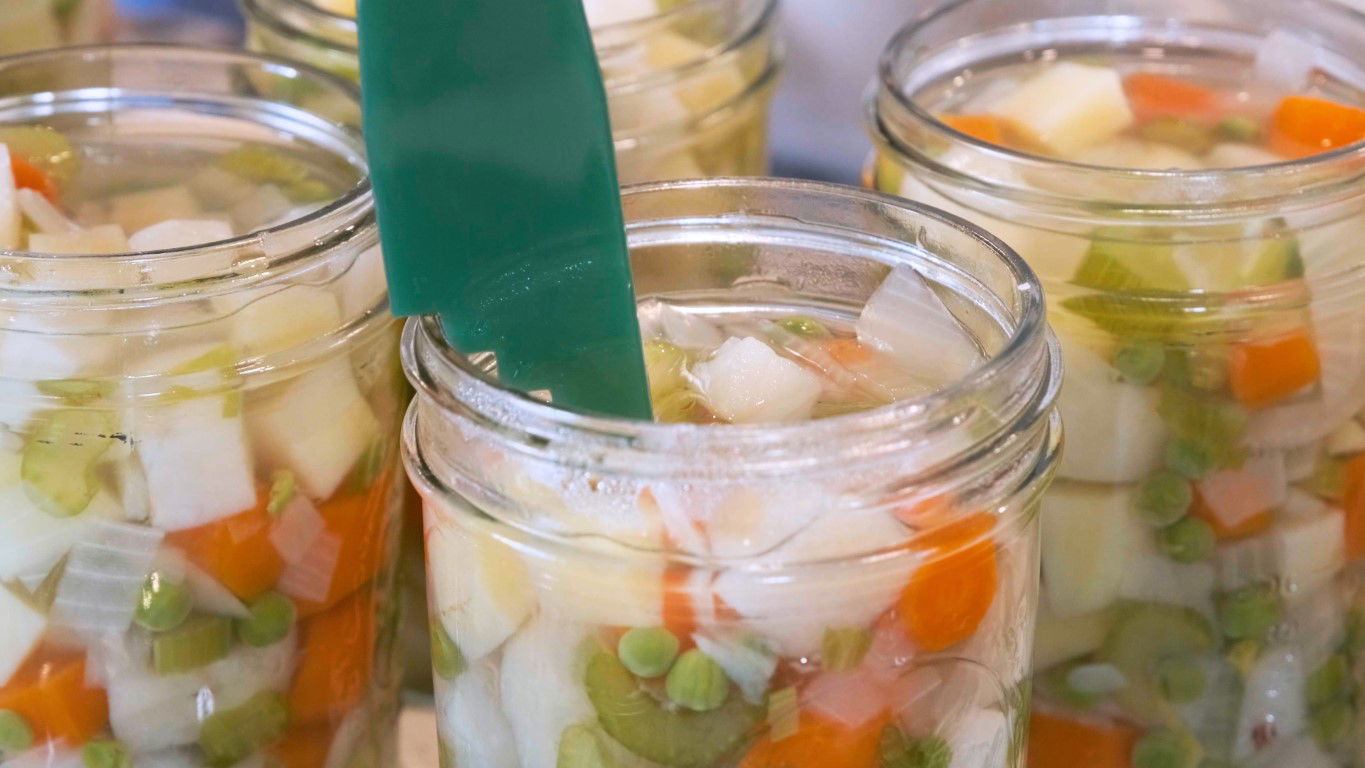
- Bubble Freer & Headspace Tool - After filling your jars, it is important that all extra air is removed to prevent bacteria growth and to ensure a proper seal. A bubble freer or popper lets you scrape the sides of your jars, freeing any trapped air easily. The bubble freer also acts as a headspace measuring tool, letting you easily see if you need to add or remove food from the jar before securing the lid and bands.
Pressure Canning With All American Canners

This guide was made to help you get started with your All American 1930 pressure canner, but it is not a replacement for the manufacturer’s manual. Please fully read the manual included with your All American 1930 pressure canner for a more thorough understanding of your pressure canner and the canning process.
What Makes All American 1930 Pressure Canners Different?
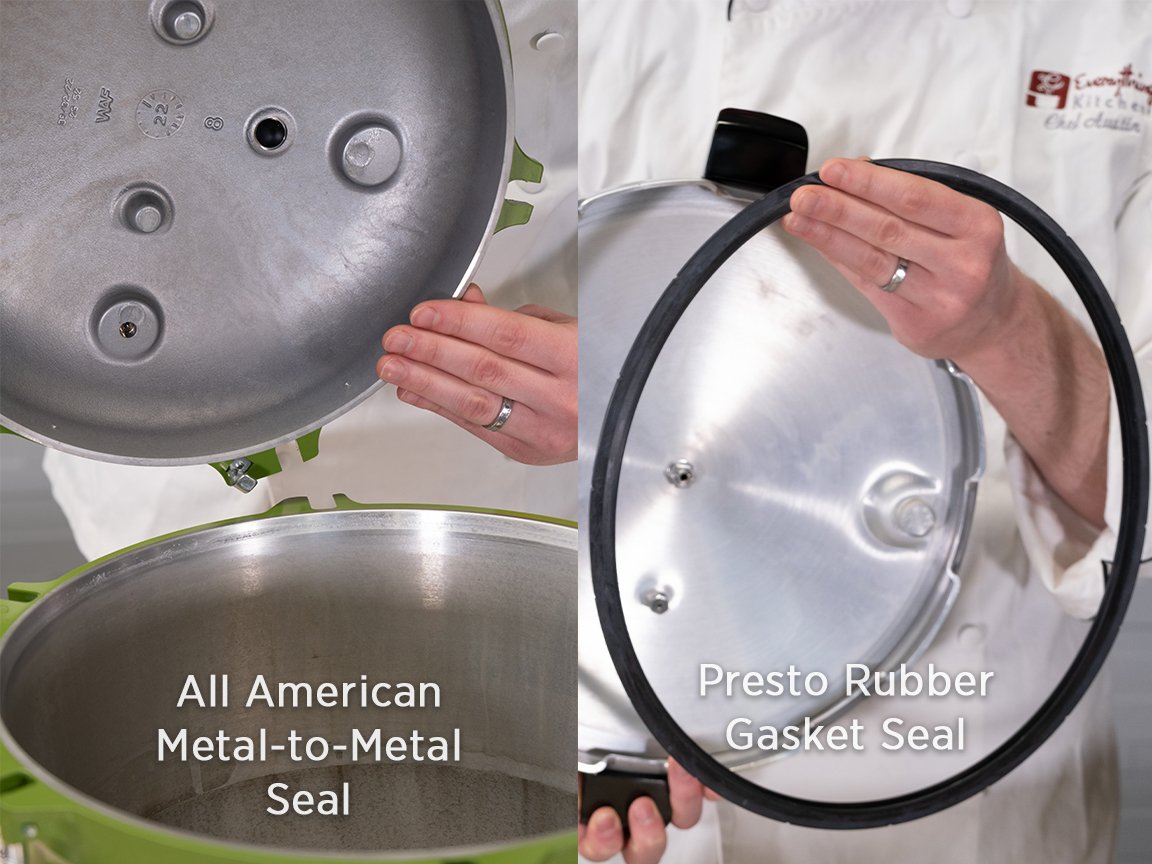
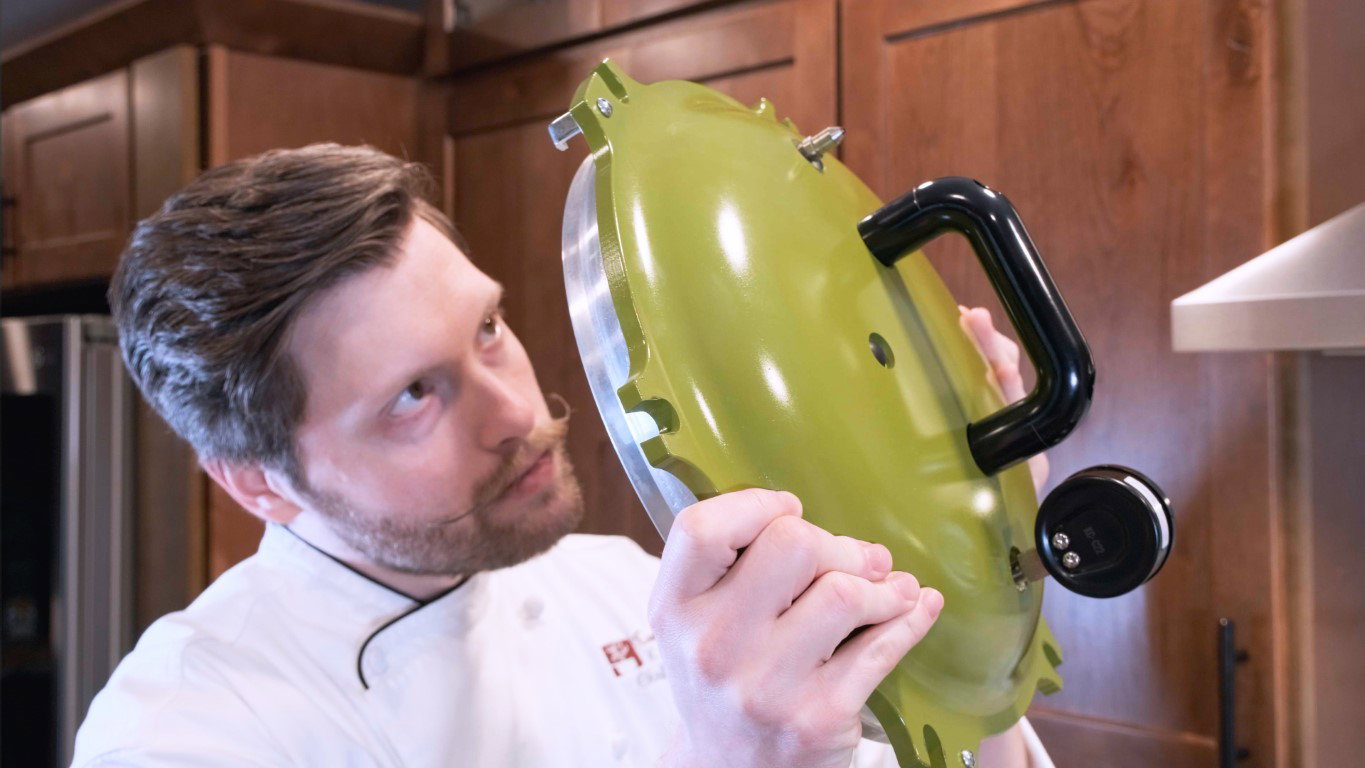
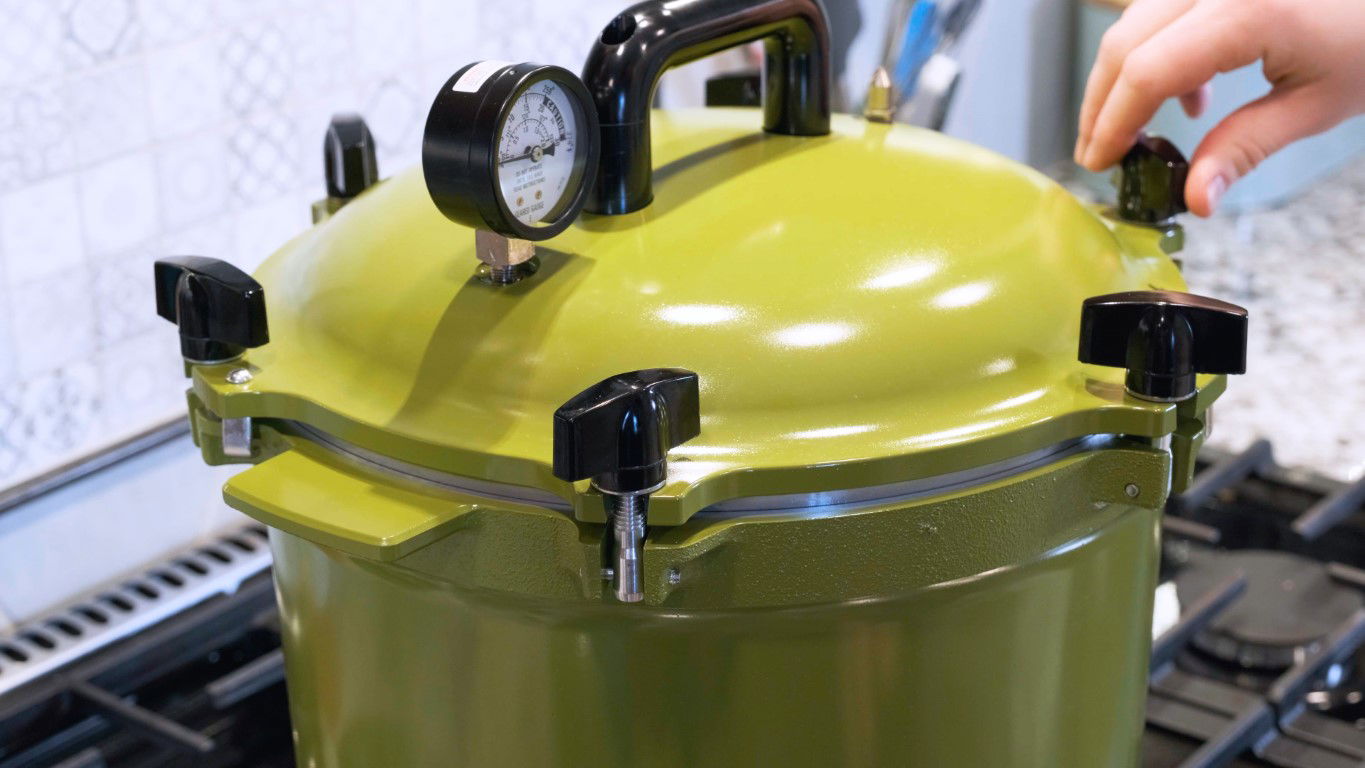
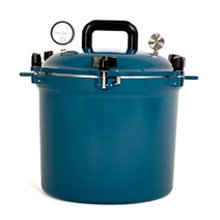
The biggest difference between most traditional pressure canners and All American 1930 pressure canners is the sealing style of the lid. Most traditional pressure canners and pressure cookers use rubber gaskets that create a seal between the lid and the base. The gaskets are effective in creating a pressurized seal, however, they can break and melt over time and will need to be replaced. The All American 1930 Pressure Canners, however, feature an exclusive metal-to-metal sealing system that requires no gaskets. Positive action clamping locks screw into the base and seal the lid to the cooker which allows pressure to build. This means you won’t need to replace parts over time, however, the wingnuts will need to be greased with either olive oil or petroleum jelly periodically to ensure a proper seal.
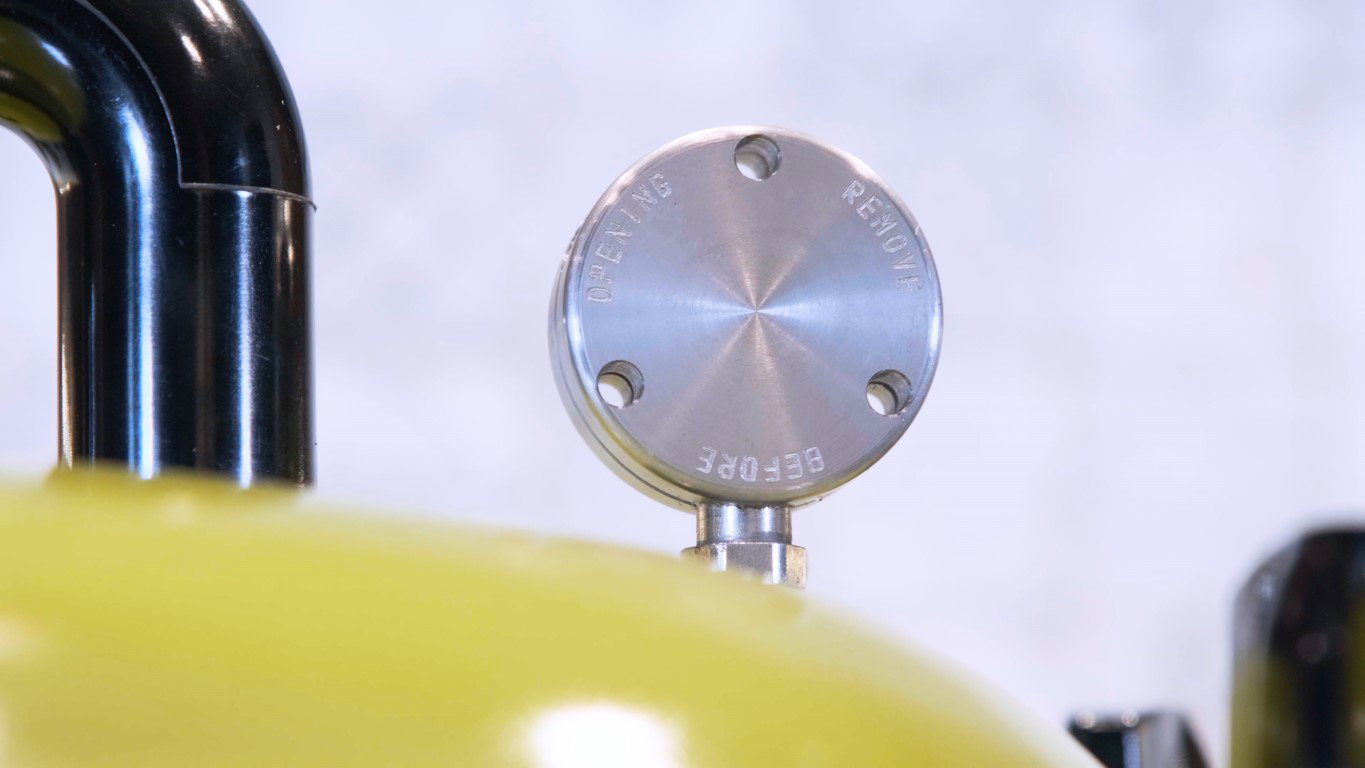
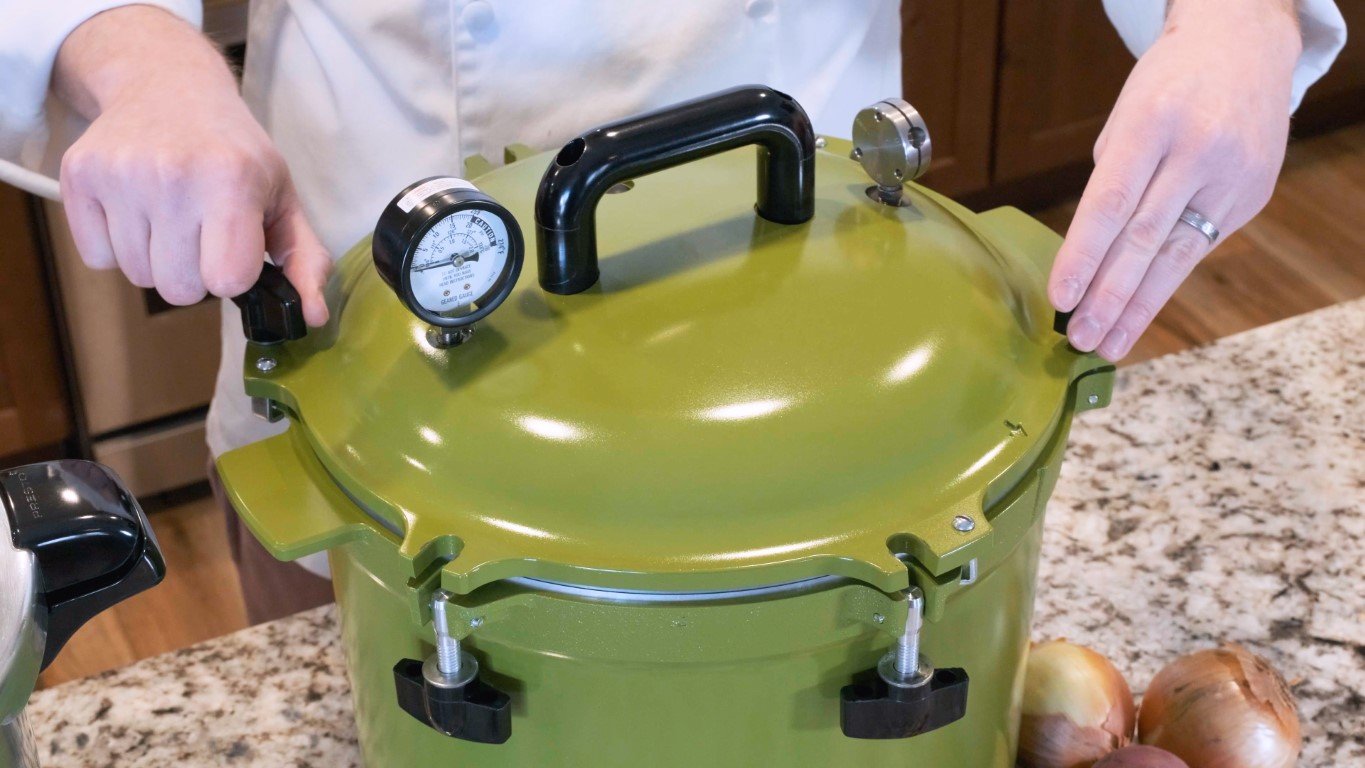
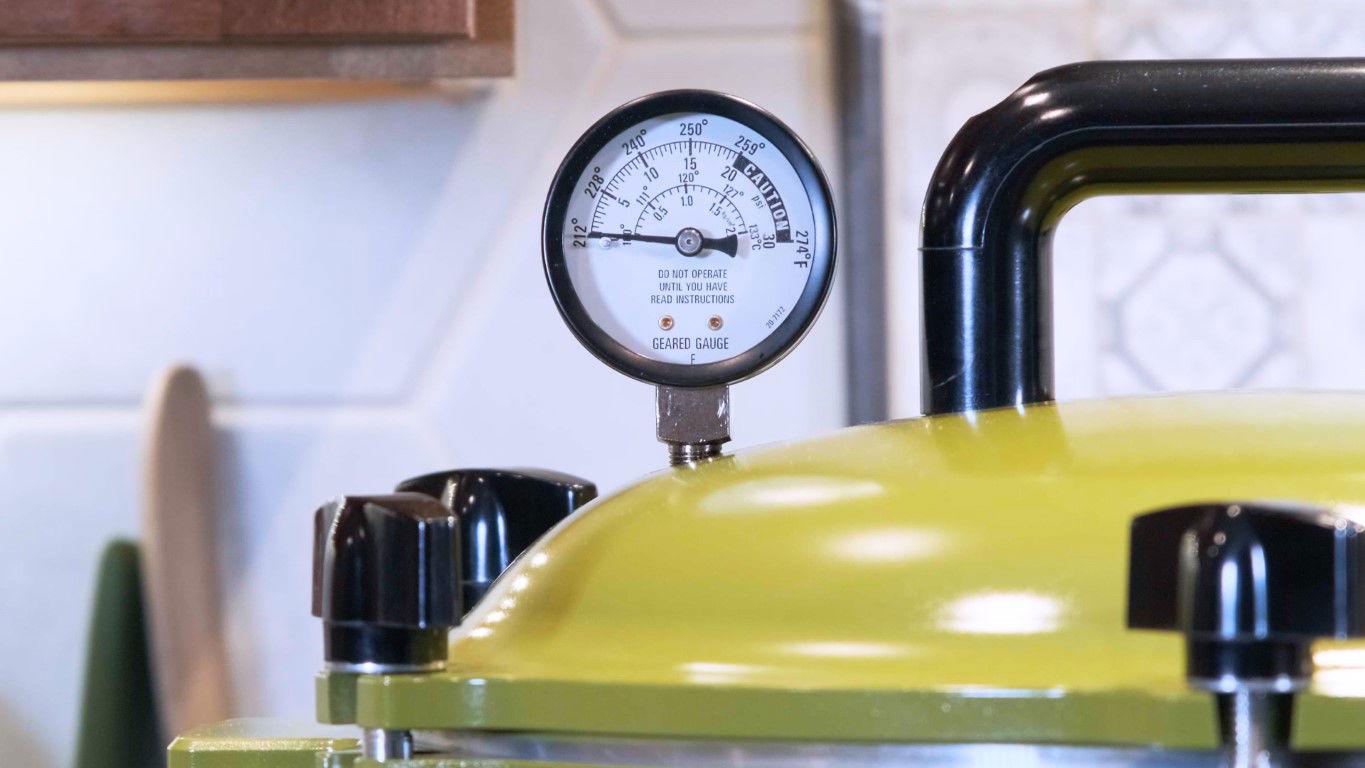
Another key feature that distinguishes All American 1930 from other pressure canners is their use of a weighted pressure gauge on the lid in addition to the dial gauge. Most pressure cookers will have a dial gauge to let you easily check the pressure within, but the addition of a weighted pressure gauge allows for auditory monitoring as well. The jiggling of the gauge makes a clinking noise that becomes rapid as the pressure rises. By following All American 1930’s guidelines that describe the optimal amount of jiggling per minute, you can monitor the pressure levels without ever reading the dial gauge.
Common Hurdles with the All American 1930 Pressure Canners
The lid looks scary. How do I install the lid the right way?
All American 1930 canners are unique because of their metal-to-metal seal. To achieve this gasket-free seal, their lid is designed with a clamp system. It may look intimidating and industrial, but it provides an amazingly safe seal while canning. First-time users may have trouble or hesitation with the lid, but we are here to help! Check out the video at the top of this page to see how to install the lid. All American also has a great guide too you can watch here. This guide is to help get you started, but please read the manufacturer’s directions on installing the lid and familiarize yourself with other safeguards listed in the manual.
CHEF’S TIP: Practice installing the lid of your All American 1930 a couple of times if you are new to this style of pressure cooker.
What side of the weight am I supposed to use?
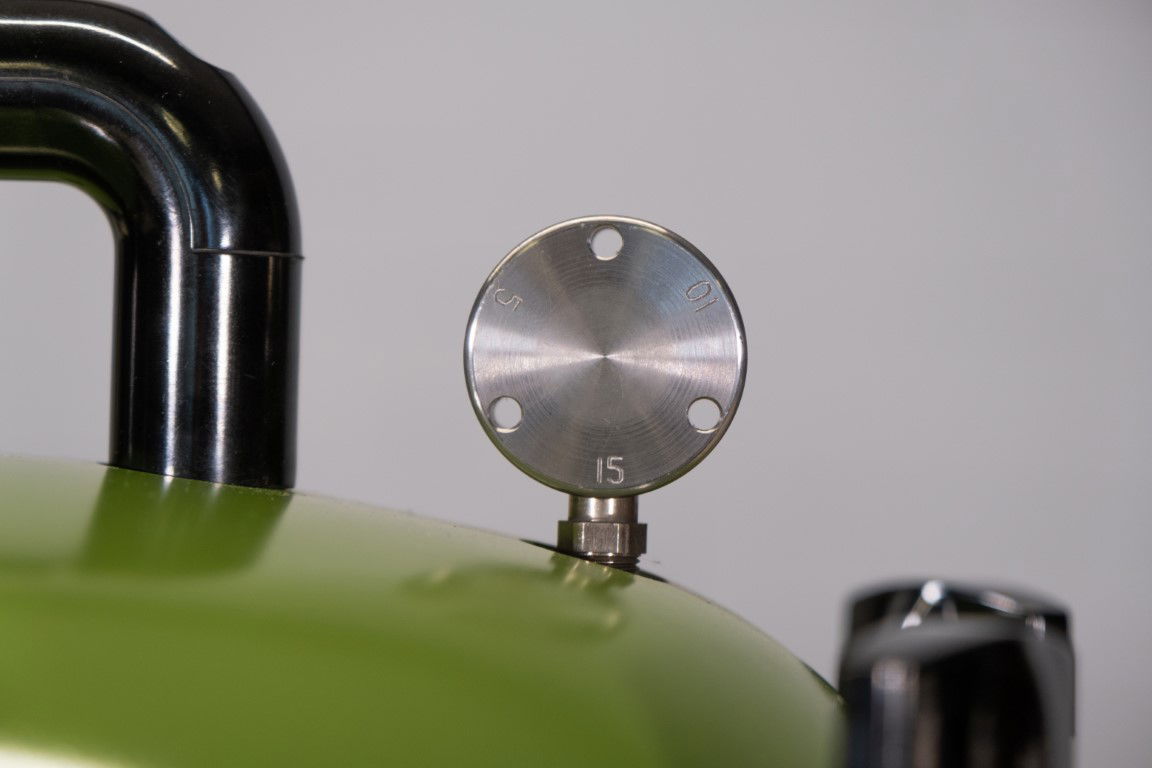
All American 1930’s weighted gauge features 3 sides, letting you choose between 5, 10, and 15psi. While a properly calibrated dial gauge is accurate enough to pressure can foods, the weighted gauge is much more accurate and does not require calibration. Every tried-and-true pressure canning recipe should tell you what pressure to can at depending on your elevation. For most recipes, you’ll be canning at 10psi if you are at 1000 ft or below and 15psi if you are above 1000 ft elevation. Simply follow what your recipe states for your elevation. The most important thing to do first is to find out your elevation (we recommend using https://whatismyelevation.com/ for a quick and easy reference).
How do I find canning recipes that are safe?
We love the National Center for Home Food Preservation site for trusted canning recipes, but you can find trusted canning cookbooks as well. Ensure any canning cookbook or reference book you use is the most updated edition that reflects the USDA’s current safe canning guidelines.
How do I keep my pressure canner at the right pressure?
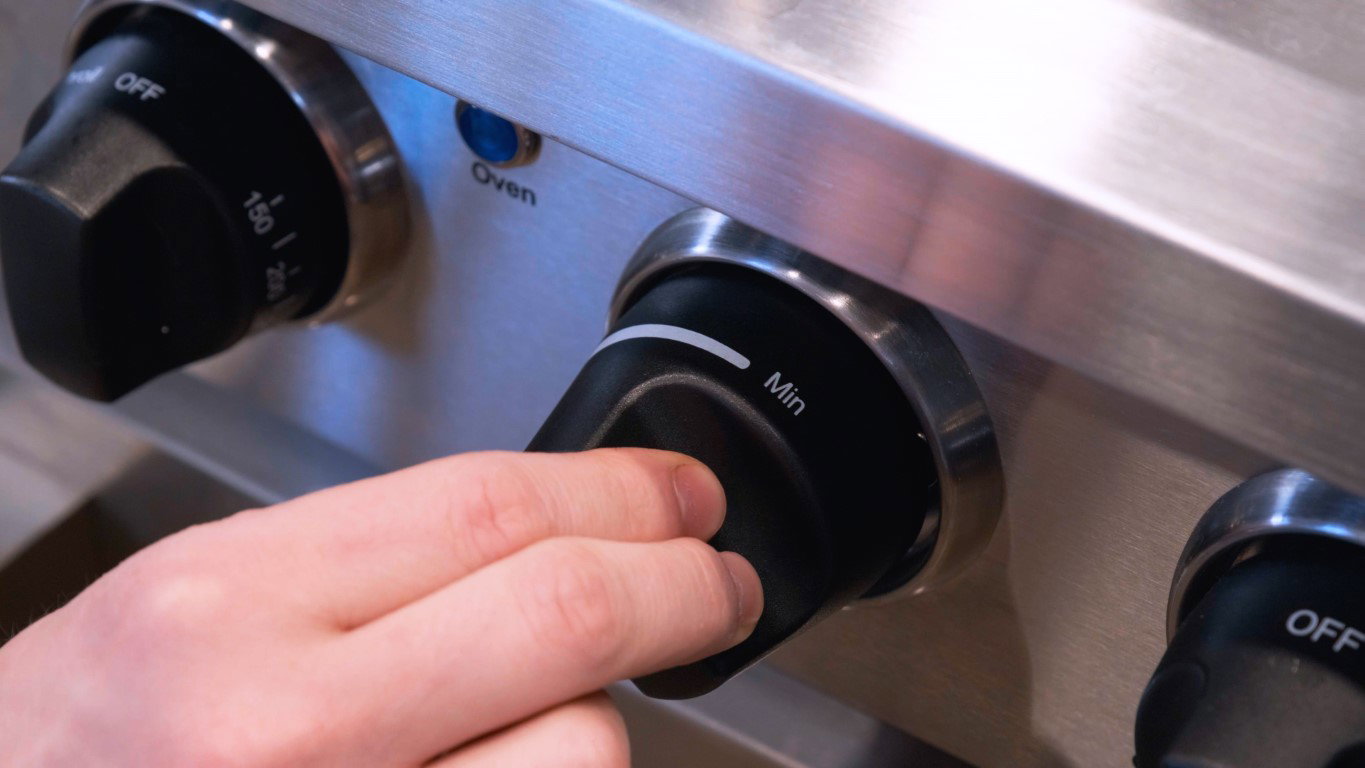
Once your canner is up to pressure, you’ll need to ensure the pressure is maintained for the duration of your cooking time. To do this, you’ll want to find the “sweet spot” on your stove’s heat settings to bring your canner to the temperature that causes 1-4 jiggles per minute from the weighted gauge. Each stovetop is different and will require a different temperature setting to achieve this, so it’ll be a bit of trial and error. Adjust the temperature in small increments up or down every 30-45 seconds until you achieve 1-4 jiggles per minute, which means you’re at the correct pressure.
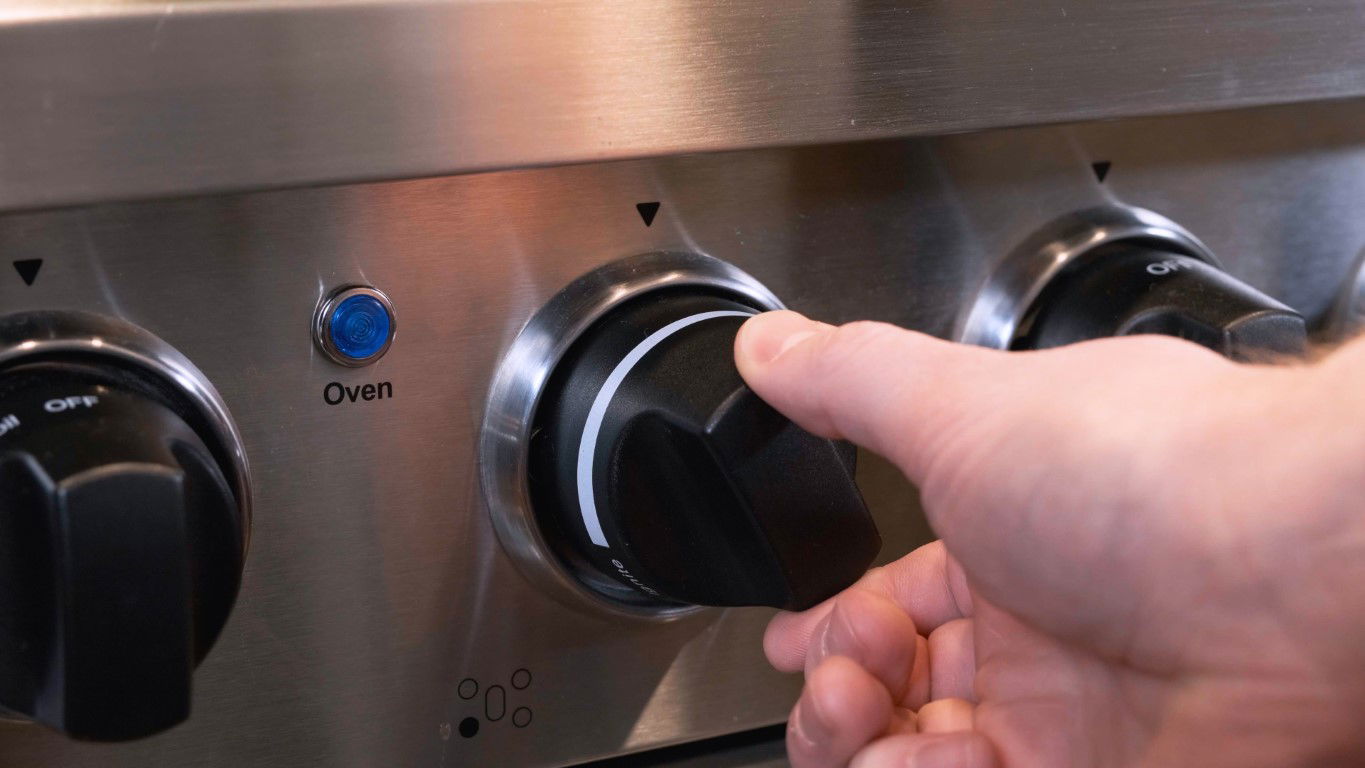
Towards the end of the cooking time, you may have to raise or lower the temperature, as the internal pressure may change as food cooks. The sweet spot on your stove will vary based on the recipe you use, how many jars are in the canner, the temperature of your kitchen, and other factors. The more you use your canner, the better you’ll become at finding the sweet spot.
I’m nervous I’ll ruin my food or the canner won’t work right.
The most important part of becoming more comfortable with the process of pressure canning is practice. If you are concerned about ruining food or jars on your first attempt, you can do a test run using only water and no jars. By doing this you can get practice installing the lid, placing the weight on the lid, finding the sweet spot for maintaining pressure, and depressurizing your canner. You will become more familiar with the sounds that you should be hearing and see how the canner operates. After completing a few trial runs without jars, you will be more comfortable operating the canner with food inside.
Read through all of the instructions before you start canning so you know what to expect.
Basic Step-by-Step Canning Instructions for the All American 1930 Pressure Canner
Preparing Your Jars
Fill a large stockpot a few inches from the top with water. Place a canner rack into the bottom of the stockpot. Bring to a roaring boil, then lower the heat until the water is barely bubbling at a simmer (180°F).
With a jar lifter, place empty canning jars into the simmering water of the stock pot. You can keep the jars in the water until you are ready to start filling. This keeps the jars hot so when you put hot food or liquid into them, they will not break from thermal shock.
Preparing Your All 1930 American Pressure Canner
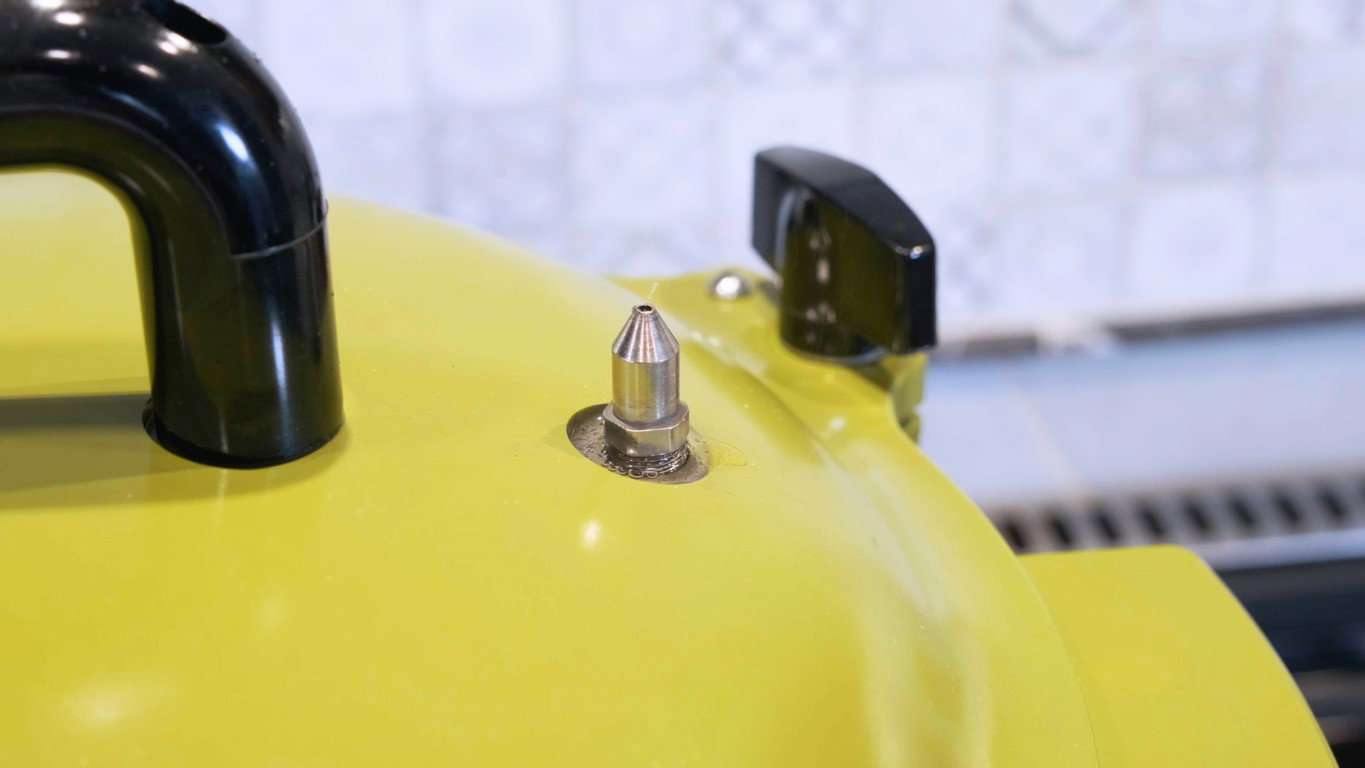
Before each use, hold the lid up to the light and look through the vent pipe. If you cannot see the light through the vent pipe, use a paperclip, wire, or pipe cleaner so that the opening is clear and unobstructed. Afterward, rinse with hot water.

Apply a thin film of lubricant (olive oil or Vaseline) on the edge inside the cooker where the inside wall begins to bevel out. Use just enough lubricant to wet the edge, but not enough to actually see it.
 Fill your All American 1930 pressure cooker pot with 2-3" of water and place the canning rack in the bottom. Bring water to a roaring boil, then lower the heat until the water is barely bubbling at a simmer (180°F).
Preparing Your Recipe
Lift a hot jar out of the stockpot with a jar lifter and carefully pour the water back into the stockpot. Place the jar on a dry towel on your counter.
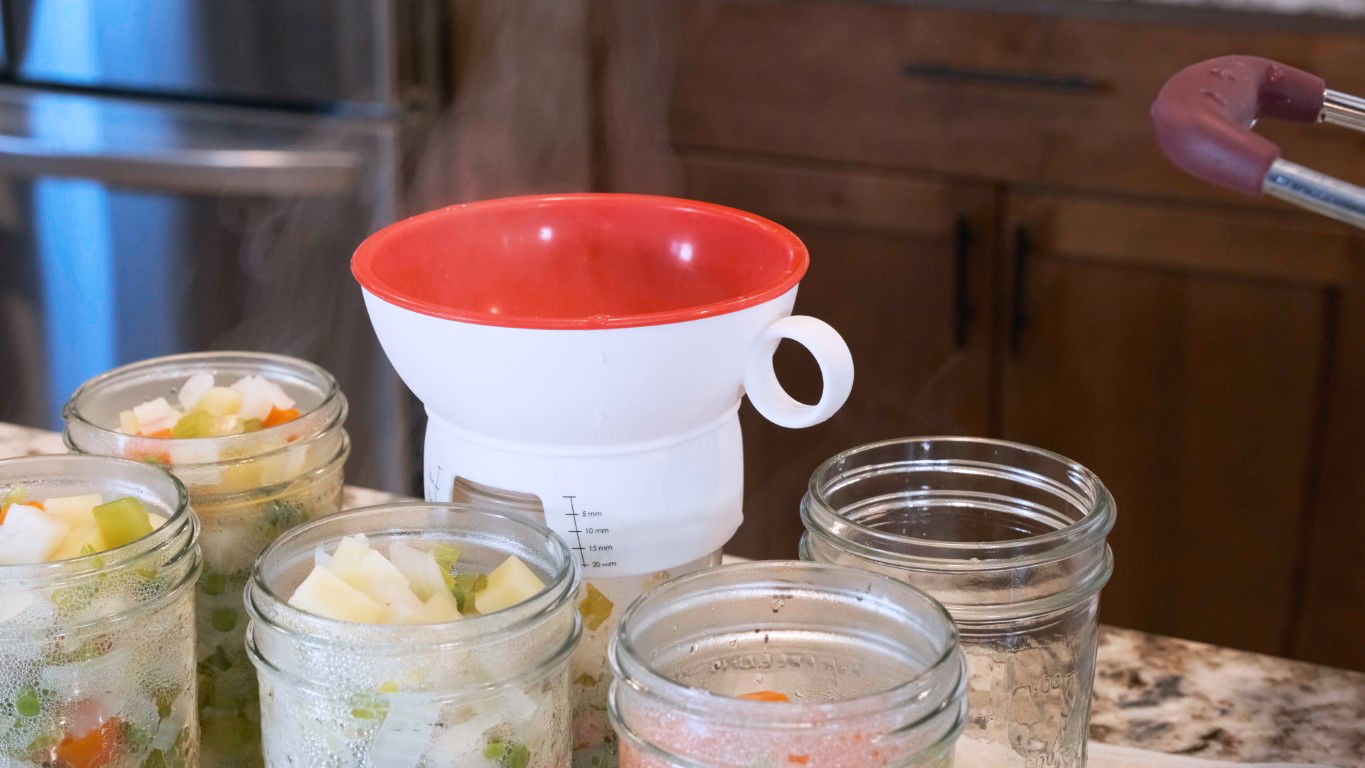
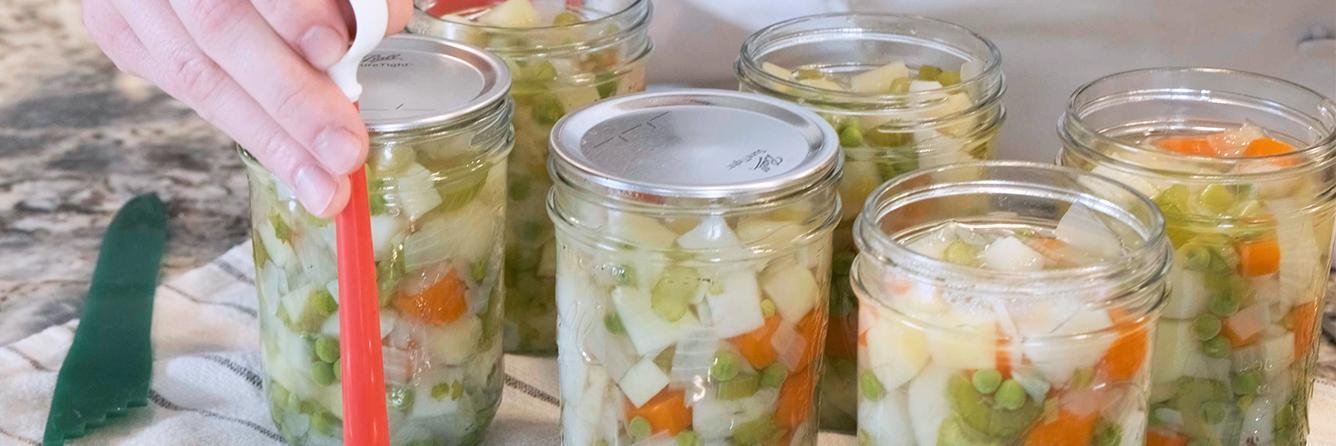
Place a canning funnel into the mouth of the jar and fill the jar with the prepared food according to the recipe. You may want to use an oven mitt to handle the hot jars.
Check for headspace with the headspace and bubble freer tool. Your recipe may tell you the correct headspace, but if not, a general guideline for headspace in pressure canned foods is 1".
Use the bubble freer to remove any trapped air by placing it between the food and the side of the jar. Gently move the food away from the side of the jar to release any air that may be trapped. Check for headspace once more, and add additional food or liquid if necessary.
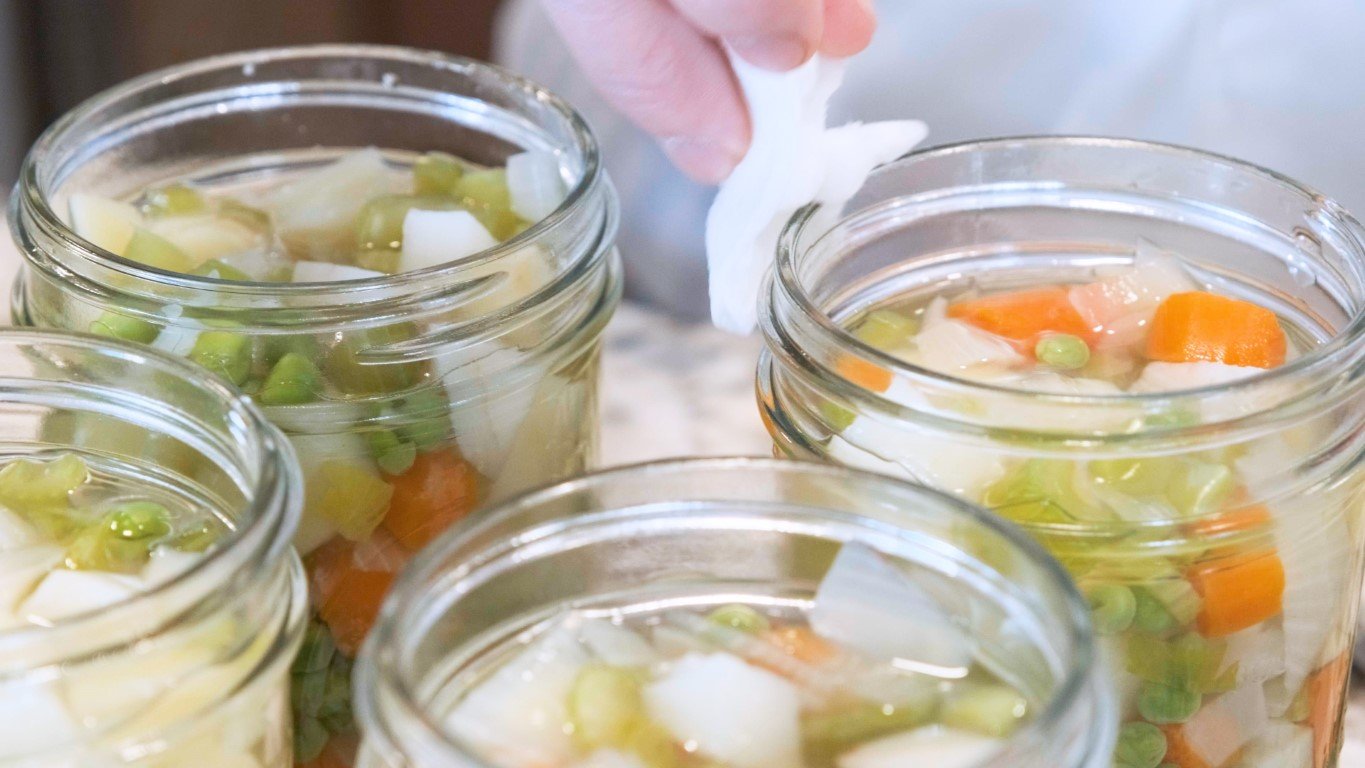
Wipe the rim of the jar with a clean cloth dipped in distilled white vinegar. Any food on the rim can cause the seal to not function properly.

Using the magnetic lid lifter, place the lid on the jar. Do not touch the bottom of the lid, as this can transfer bacteria to your food. Install the band and screw it on until fingertip-tight.
Adding Jars to Your Canner
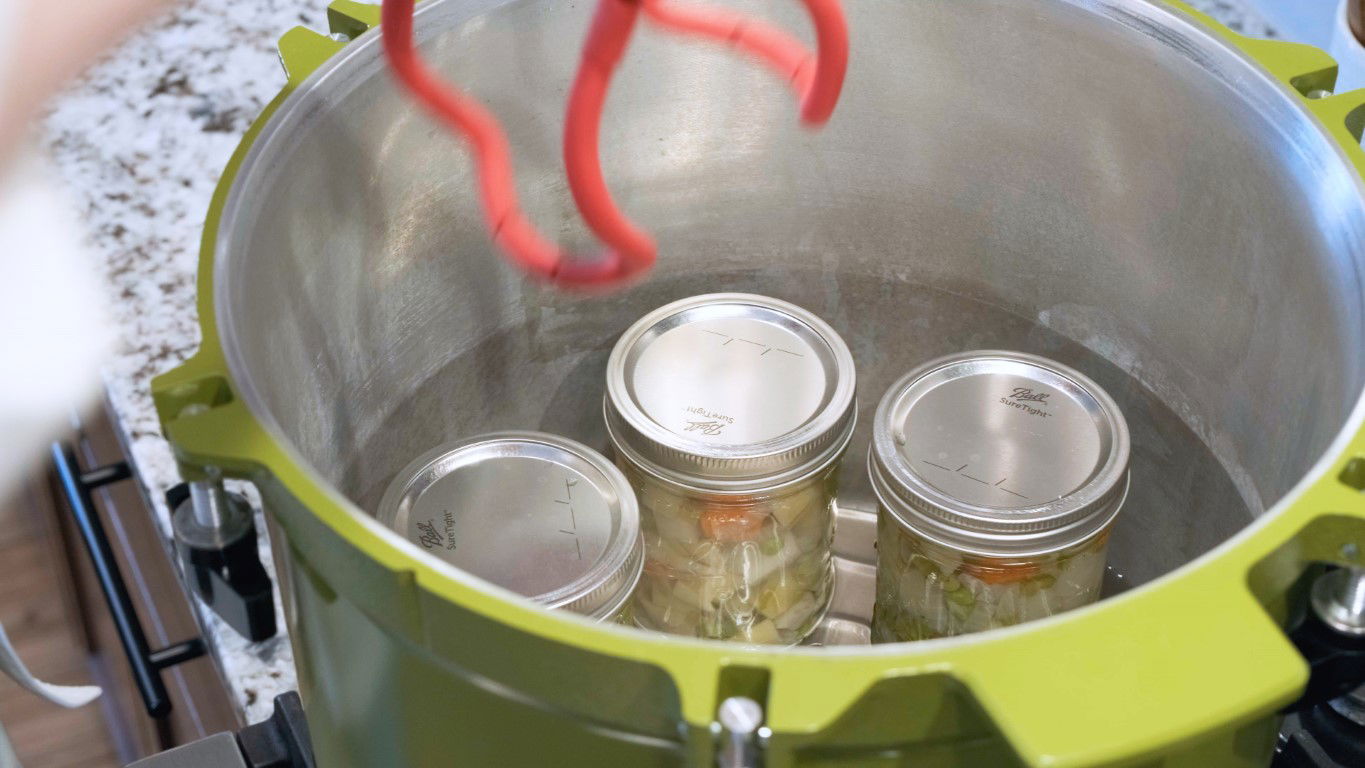
Using your jar lifter, place your filled jars onto the canner rack until the canner is full. Jars should not be touching each other. You can place the secondary canning rack on top to add a second row of jars to the canner. Jars on the top rack do not need to be submerged in the water.
Installing the Lid
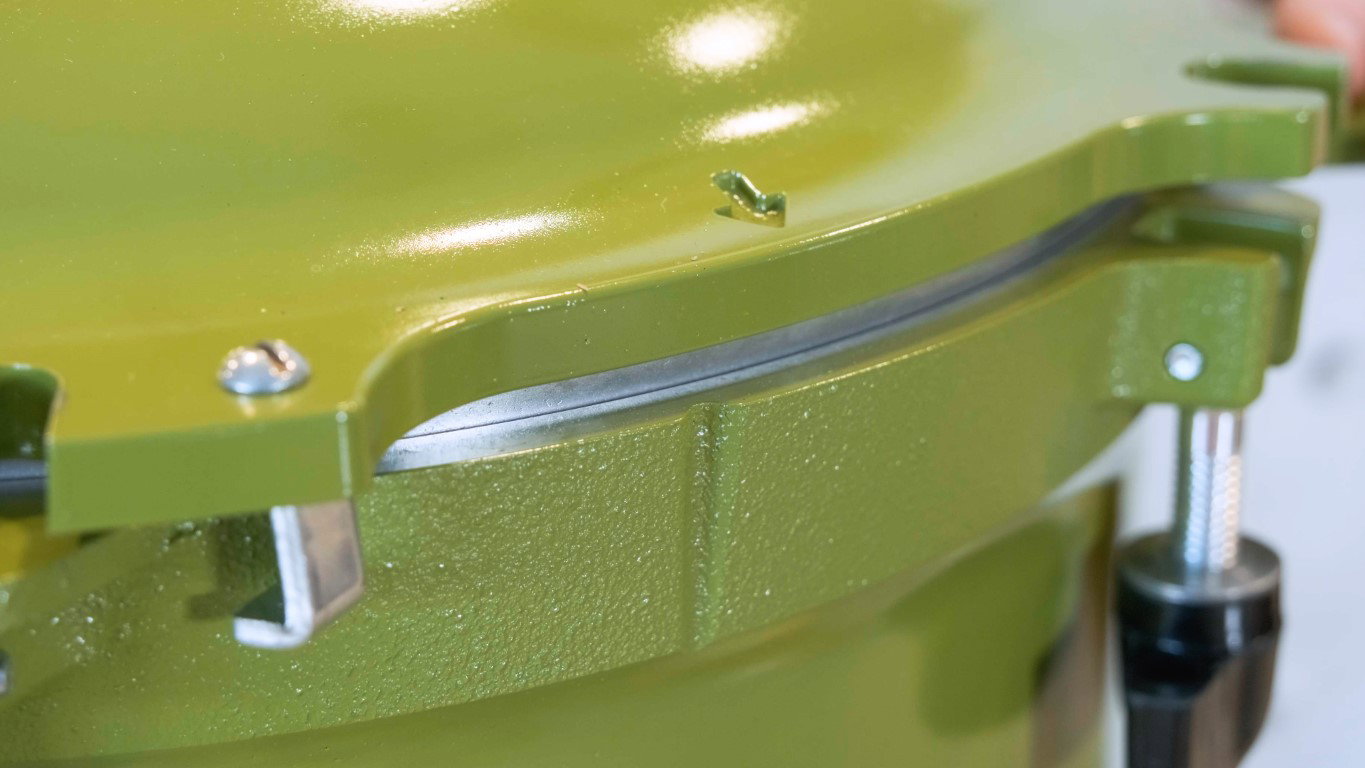
Using the handle, set the lid on top of the canner base so the arrow on the lid is a little to the right of the notch mark on the bottom.
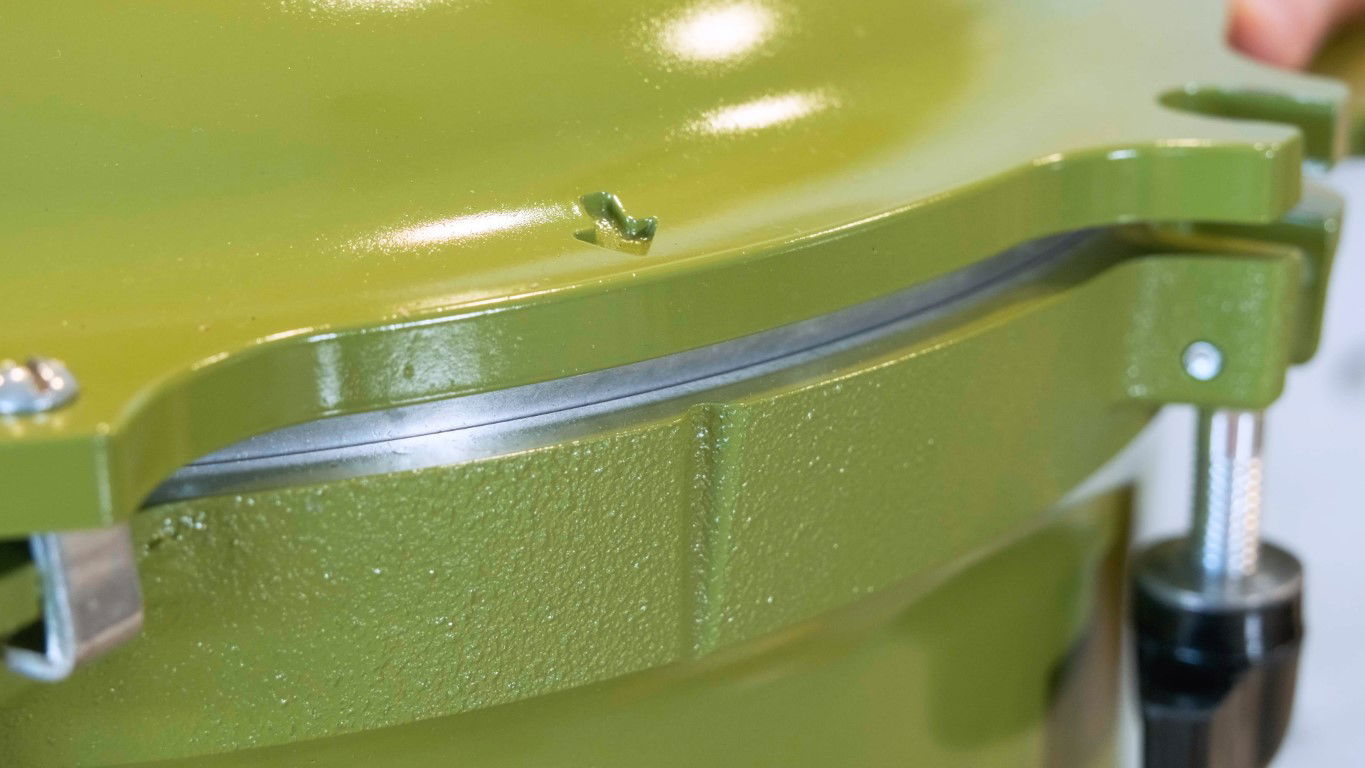
Using the handle, turn the cover clockwise to line up the arrow on the cover with the notch mark on the canner base. This will engage the bayonet clamps under the lugs.
Grasp two opposite wing nuts, one in each hand, and flip them up above the lid into the notches. (You may need to loosen the wing nuts by turning them counterclockwise in order to get them to fit over the cover.)

Gradually and evenly tighten the two opposite wing nuts down by turning them clockwise. At that point, make sure the gap between the cover and bottom is even under the two wing nuts by getting an eye-level view of the gap. Never tighten just one wing nut at a time. If the gap is not even under the two opposite wing nuts, loosen the side that is low and tighten the side that is high until the gap is even.
Repeat steps 3-5 until all the wing nuts are secured.
Turn each wing nut one more time to assure they are snug. Hand-tighten only. Do not use a wrench or any other tool.
Double check the gap between the lid and bottom to make sure it is even all the way around. If it is not, you will need to undo the wing nuts and repeat the above steps.
Venting and Starting Your Timer
Increase your stove’s temperature setting to high heat until a steady column of steam escapes from the vent pipe. Set a timer for 10 minutes and continue to steam. This removes the air from the inside of the canner.
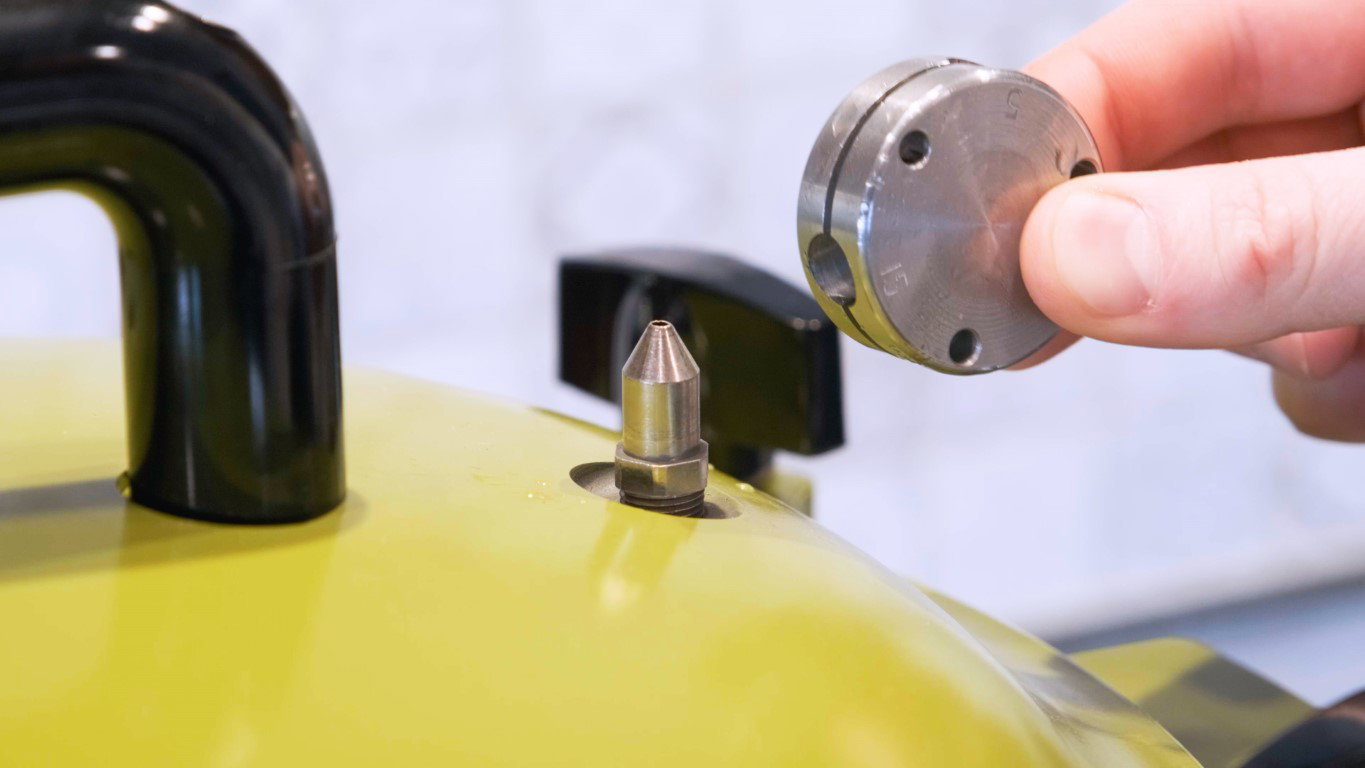
After 10 minutes, place the pressure regulator weight on the vent pipe with the correct pressure based on your recipe and altitude. You can read the dial gauge to help you see the approximate pressure inside your All American 1930 canner. Once you see the gauge approaching your desired pressure (2-5psi away from the target) reduce the heat to low/medium-low and allow the canner to slowly reach pressure.
Jiggle Time
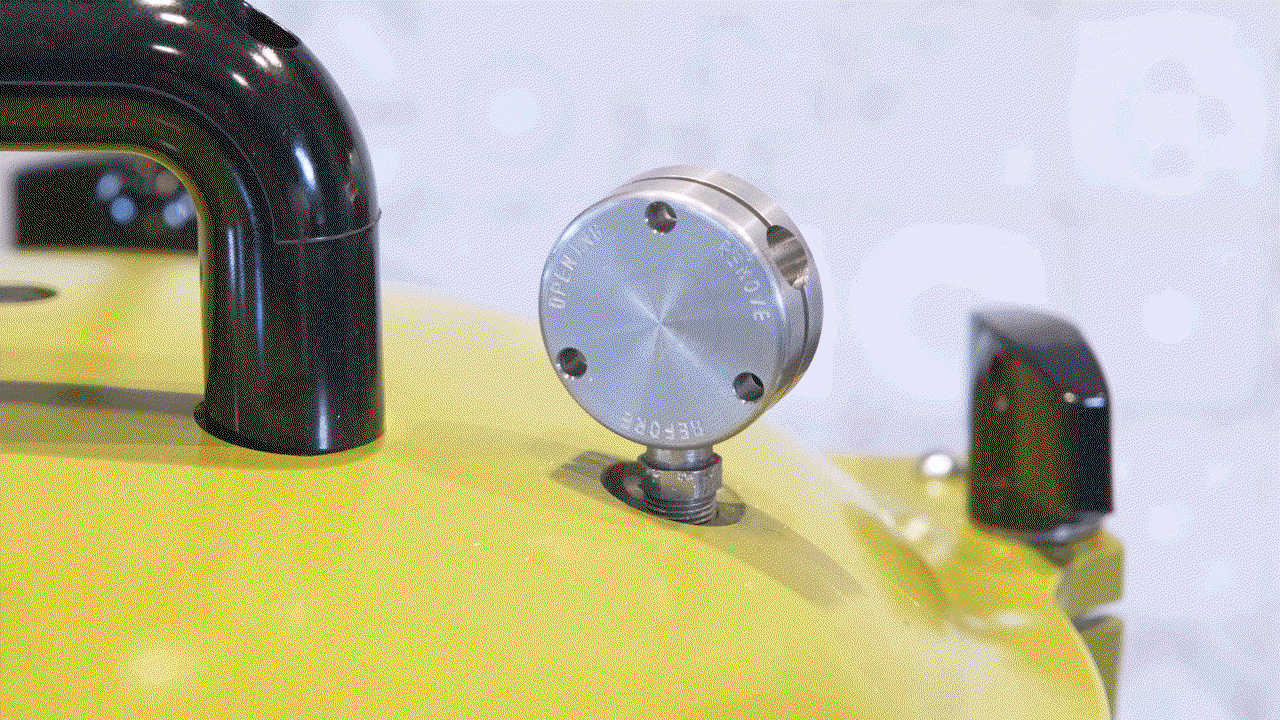
Once you hear and see the first jiggle or rock of the pressure regulator weight, you can start your timer for your recipe. At this point, you’ll need to ensure the pressure is maintained.
You will need to find the “sweet spot” on your stove’s temperature setting to maintain the correct pressure. In very small increments, adjust the heat on your stove until the pressure regulator weight jiggles only one to four times per minute. If you have a constant jiggle, reduce the heat and wait a couple of minutes to see if that minimizes your “jiggles per minute.” If you do not hear any jiggling, your canner is not up to pressure and you need to raise the heat. DO NOT go off of the pressure gauge, as the weight jiggling is more accurate.
Tips From the Manufacturer:
*Never turn up the heat to the point that a constant flow of steam is escaping, thereby causing the pressure regulator weight to be constantly in the “up” position.
**Experience with the pressure regulator weight will teach you what setting on your stove will maintain the proper pressure and how long it takes before the pressure regulator weight jiggles or rocks. This will depend on which size pressure cooker/canner you have and how much food you are canning.
Depressurizing and Cool Down Time
When the food has cooked at the proper pressure for the correct period of time according to your recipe, turn off the heat source.
Let the pressure cooker naturally release pressure. To do this, do nothing. Do not touch the pressure cooker or remove the pressure weight; leave it undisturbed until the pressure gauge reads zero. This can take 10-30+ minutes. DO NOT attempt to speed cool the canner by running it under cold water, setting it in a cold environment, or manually jiggling or removing the pressure weight. This can cause jars to break, liquid to siphon from the jars, or improperly sealing of food making it unsafe to consume. Be patient.

Once the gauge reads zero, remove the weight using an oven mitt. Wait two minutes and then unfasten the lid. Lift the lid away from you with the top handle to prevent steam burns.
Finishing Up
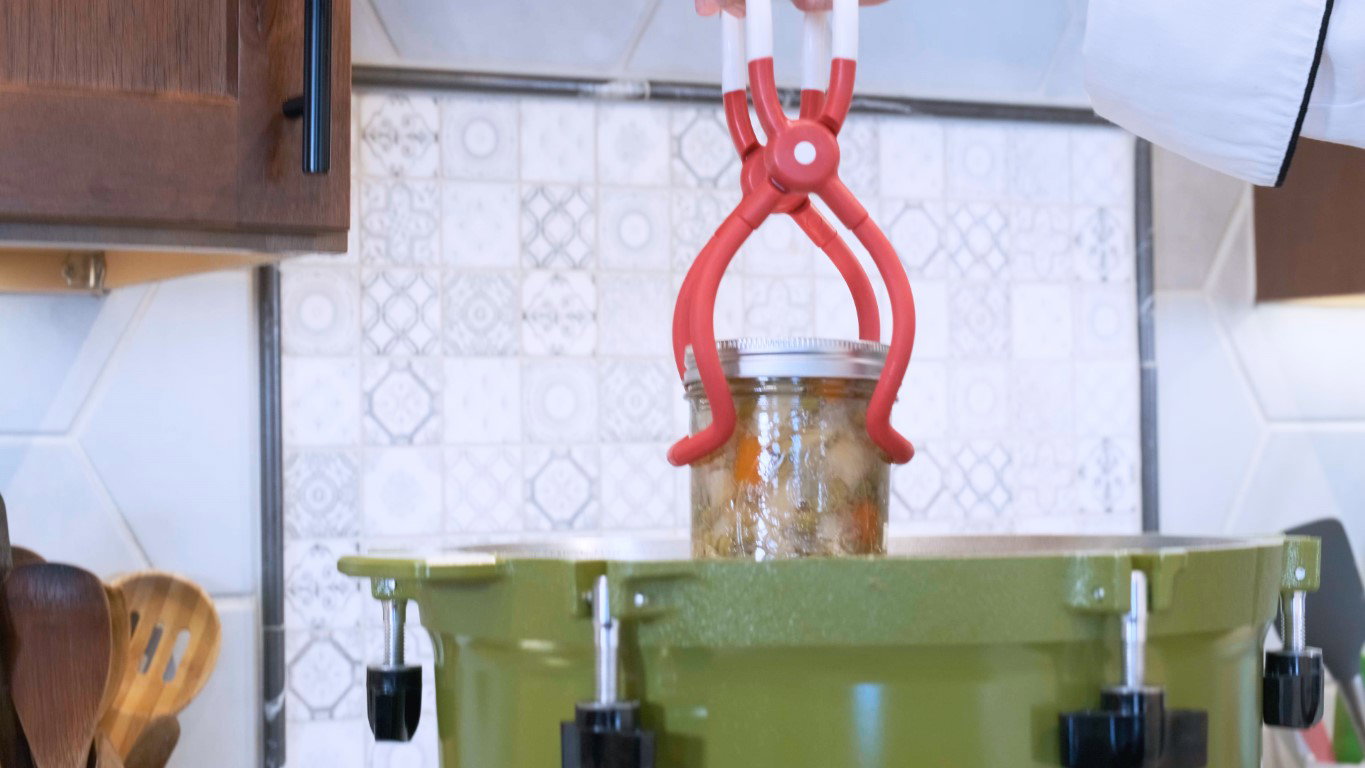
Remove the jars with your jar lifter and place them onto a cooling rack or large towel on your kitchen counter.
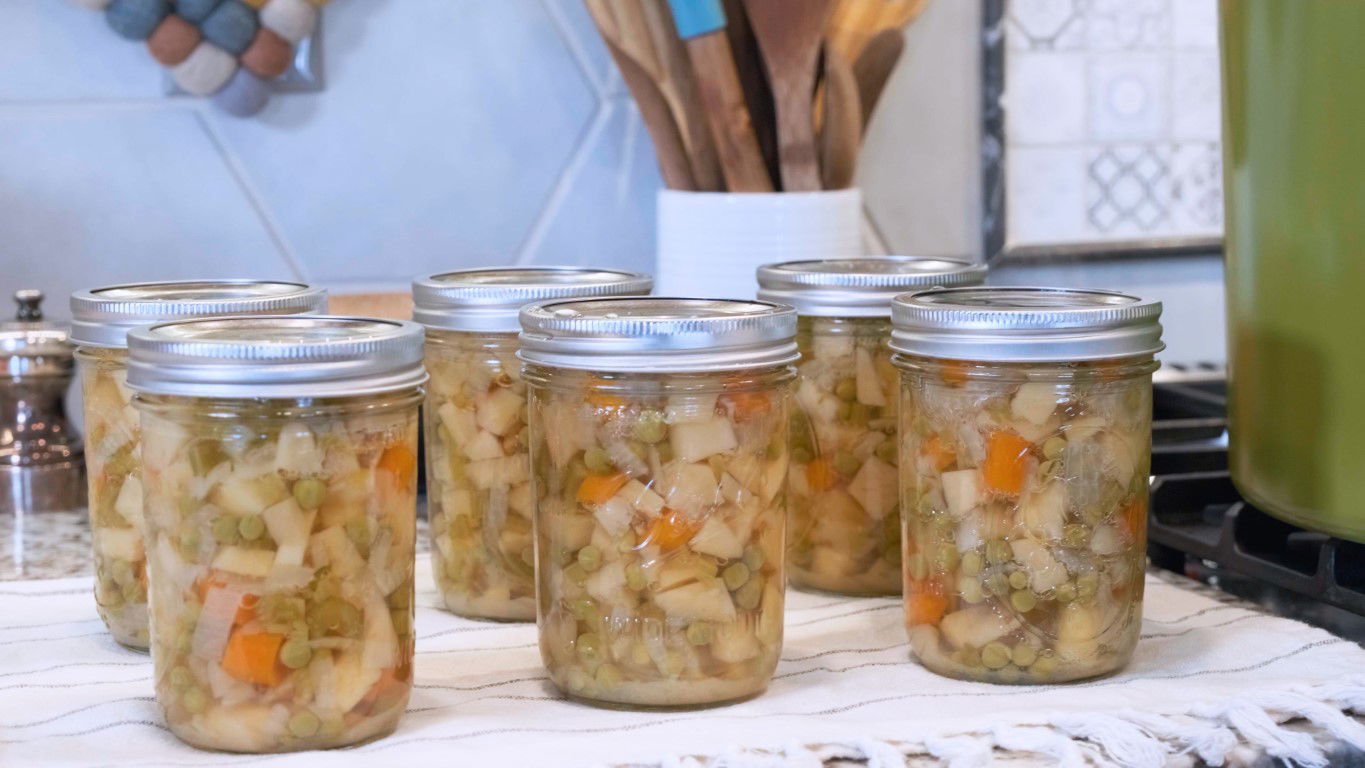
Let the jars sit undisturbed for 12-24 hours. Check lids to make sure they have sealed. Any unsealed jars should be refrigerated and used within the next week.
Test jars for a vacuum seal. Gently press into the middle of the lid to see if there is any give. If it does not move or concave, the jar is vacuum sealed. Remove the metal band, wipe it down with a clean damp cloth, and hand-tighten it back onto the jar.
Be sure to label each jar with the contents of the jar and the date your food was canned. Store in a cool, dry, dark place. For best-tasting results, eat canned food within one year.
Cleaning
After the canner has cooled, you can use a mild dish soap and cloth to wash the inside of the canner and the lid. Hand-dry after washing, and store the pieces together for convenient canning during the next harvest.
Final Thoughts
Beginning the process of pressure canning can be intimidating if you are a first-time canner. But by following a few simple steps, you can easily become a master food preserver by the end of your first canning season. All American 1930 Pressure Canners are perfect for any homesteader, from beginners to advanced. There is a slight learning curve for those who are used to traditional pressure cookers, however, the added accuracy of the weighted gauge allows for less room for errors and uncertainty when getting acquainted with the pressure cooking process. We hope our guide gives you more confidence when beginning to process foods with your All American 1930 Pressure Cooker and wish you all the luck in your canning endeavors!
Shop Top Pressure Canners


Have any more questions about your All American 1930 Pressure Canner? Give us a call at 866-852-4268 or email us at [email protected] and one of our customer service heroes would be happy to help!